Saturday 11 March 2017

Great Tip from Starships & Steel!! DIY Explosions!


Great tip for making explosion markers!!


This is an awesome idea!! Very simple and seems very fun to make! Check him out!


Wednesday 26 August 2015

More Progress! 15mm and 6mm

While I am waiting for my other shipment of troops and vehicles to arrive, I have been making lots of progress on my 15mm GOTA troops, Space Demon Infected and my 6mm Skyth.

All glued to bases and primed. Airbrushing base colors in the next few days!

Wednesday 29 July 2015

Parcel Full of 15mm Goodness

When I order stuff, I try to arrange it that the items arrive just after I return from my 3 week rotation of work, or order it so it arrives while I am at work and is home for  when i return.
Sadly, due to some delays in the post, the night before I leave for work, I get a parcel filled with 15mm Khurasan GOTA miniatures!
Now, for the next 3 weeks I am going to be torturing myself, thinking about how I am going to paint these!

Look at these bad boys!


Tuesday 28 July 2015

Painting Progress: Lens Flares and Highlights

So, the other day I was trying to figure out and find a good "how to" paint lenses video and I was having trouble trying to find a simple one, along with the style that I like.

I found this video, and I really liked it. Figured I share it with you all, as it really helped me, and its the simple, basic style that I like and I think it works.


Here are some of my tests to see what it would look using the same technique from above.


Now, I would like to show you some of my progress with my highlights of my urban combat vehicles.


The Bat, by Matchbox.


Federal Combat Suits by Khurasan


And lastly, Hybrid Wheel/Gev APC by Khurasan


Sunday 26 July 2015

Time to break out the Highlight Brush!

After the last few touchups on the camo its time to be moving on to the mid stage of my painting bonanza!
No idea on how I am going to paint the two trucks in the background yet tho!
If all goes well i hope to have the majority of my detail work done before I go away for 3 weeks for work in a few days.


Thursday 23 July 2015

Making Progress: Vehicle Painting.

In a few short hours I was able to paint all the vehicles with their primary camo. I also messed around with my Forrest Camo and then tried to weather it..

I may have wrecked them.. :(  I think I am going to have to re do them. They looked great before I tried it... disappointing. Oh well, thats how we learn..

All is left to do is a few touch ups, tires, weapons and the lenses/glass.

Speaking of which, can anyone link below a simple easy tutorial for doing lens/glass flare?  I want to have red and/blue lenses and I can not seem to get it right and I cant seem to find a good tutorial online for doing lenses on 15mm scale minis.

Tuesday 21 July 2015

Space Demons, Urban Camo Troops and a Quick Paint Tip.


Hi again,

Today, I made a little more progress with my Khurasan Space Demons.

Previously, I had them and they still looked almost black, and I am trying to make them look different then the traditional "Alien" and after some thought decided to go back to the drawing board.

Old paint scheme (Base colors)

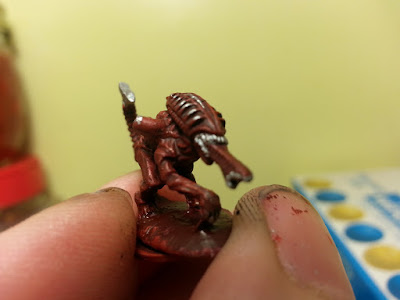
So I restarted again, and I decided to fall back to my WH40K Days, and decided to make them look like their name sake... Demons.

So I re painted them all with a light red coat, and then gave them a heavy dark red wash (Home made recipe)  and I then went with metallic highlights. I used a silver/chrome color to paint the teeth, claws and the tail blade. I found the silver made it catch the light a little better while on the table, and for me, its about making your minis stand out on the table, and not blend in.

So now, they look more like actual demons.

Much happier with the new look. 

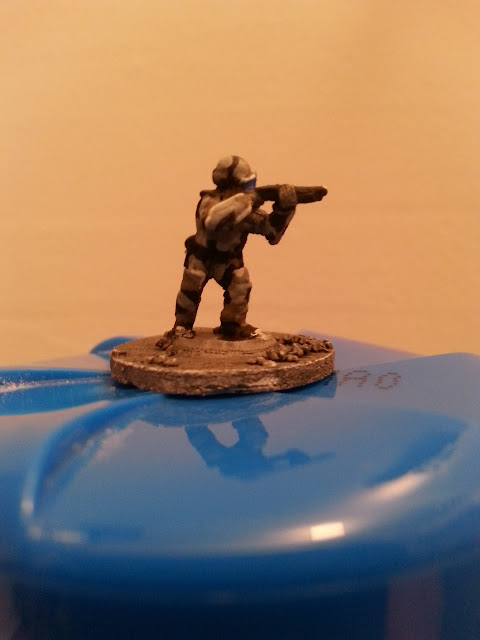
I also decided to paint the camo color that I used on my tanks on to some older minis I had from when I first started buying 15mm. These are the special forces minis from "Rebel Minis" which I really like, but never got around to actually paint. I need to get a good Mat Clear Coat for them.


 And last of all, while I was messing around I found some more old "Rebel Minis" SAS troopers. Again, back when I first started to paint these things and I decided to go for a yellow "Tyvek Suit" look so I painted them all a stained mustard color and I messed them up so bad, I threw them in the box where I did not look at them again till today. (3+ years later)

Old Gross Yellow..


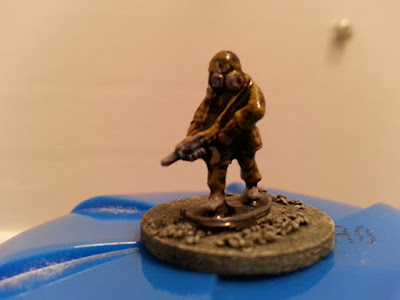
I was so utterly pissed off with having to look at the yellow, I decided to play around and fire on some blue wash see if I could get them to turn a nice color for the table. I was really impressed with how "Olive Green" they turned out, and they all had decent shading automatically done from the wash, I manged to stumble on a very easy way to paint figures in army green fatigues.

Blue wash added in heaps!


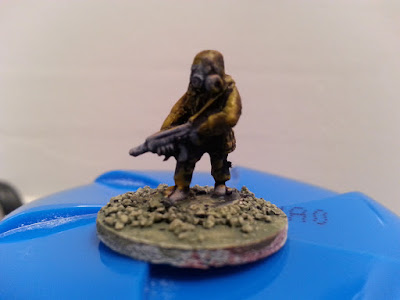
Instant Olive Green with natural shading

Only thing left to do is add highlights!


Step 0: Prime everything white
Step 1: Paint everything yellow.
Step 2: Wash everything with a blue wash
Step 3: Let dry and paint what ever details you want. I plan on using a light green to paint the ridges of the clothing.
Step 4: Play them on the table!

I have a pile of federal troops left to paint from Khurasan, and I am going to do this method and hopefully Ill have almost everything I need at least table top ready!